 The best way to protect your digital privacy is to use a computer without an internet connection, read books instead of web pages and meet with people in person instead of chatting with them using your Mac’s/iOS FaceTime camera. Okay, that sounds a bit odd in today’s always-connected world, when even your refrigerator is connected to the internet so it can order milk when you run out. So what are the options for Mac users with a huge appetite for content and information shared on the internet? How can they protect their privacy? Along with using the private browsing setting in Safari (or whichever preferred browser), the best way to surf the web anonymously is by using a VPN service. Sign up for a VPN account with the VPN provider of your choice (we have ranked the best here), enter the credentials on your Network settings, and start browsing.
However, most of us have multiple devices connected to the internet, such as a mobile phone, a smart TV, a set-top box, or maybe a gaming console or the like. Your online activity is protected while using the Mac, but you’ll become vulnerable again every time you connect any of these other devices to the internet.
How to Connect All Your Devices to a VPN Using a Single Subscription
Fortunately, there are three ways to shield all of your online activity from the prying eyes of hackers, the government, or whoever. You can either: buy a ready-to-use VPN router and therefore it is already configured for VPN connections; flash your router and install custom firmware to configure for VPN; or the cheaper and easier way, set up your Mac as a VPN router.
The first option is a no-brainer: some VPN service providers have VPN routers on sale that allow you to direct the traffic of all connected devices through a secure server. Others partner with companies such as FlashRouters to offer flashed VPN routers that are preset to connect to their VPN service. You can achieve similar results by flashing your own router and installing DD-WRT or Tomato firmware on it and configuring it for VPN. That may require some advanced knowledge, however, so it’s not something rookie users will be keen to jump on.
Best VPN Services for Mac of 2024
| Rank | Provider | Info | Visit |
|
1
|
Editor's Choice 2024 |
|
|
|
2
|
|
||
3
|
|
How to Turn Your Mac Into a VPN Router
The easiest way, however, is to turn your Mac computer into a VPN router. Use the VPN subscription you already have to route the traffic from all devices to a secure server and get full protection on both desktop and mobile.
To do that you need two things: a Mac with an Ethernet port and a VPN subscription, as well as the time and nerves to systematically go through the steps and deal with the error messages you may encounter. The Ethernet port is needed because you will need to connect your Mac directly to the modem or router.
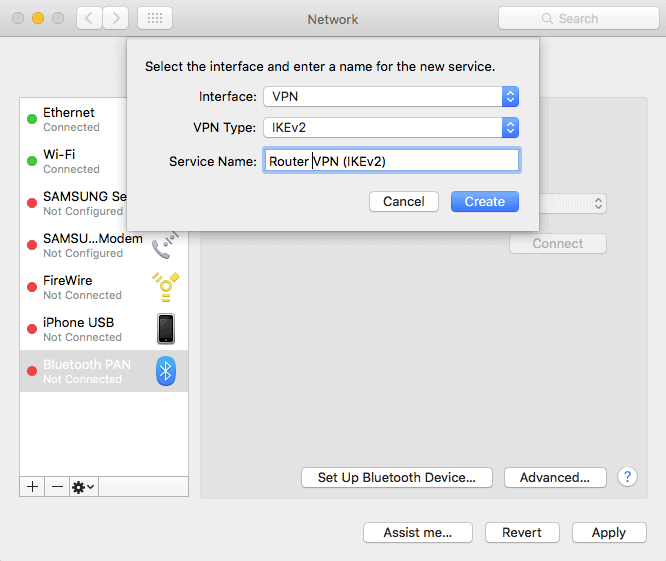
In this scenario you won’t be using the VPN service provider’s Mac app much, so don’t bet on getting any help from it. Upon launching System Preferences, open Network and get started by adding a new service with the VPN interface. You’ll need to decide on the protocol you will be using to connect to the secure VPN server with, and there are three types to choose from: either L2TP over IPSec, IKEv2 or Cisco IPSec. During the setup process you’ll also need to enter the VPN server’s address, so be prepared.
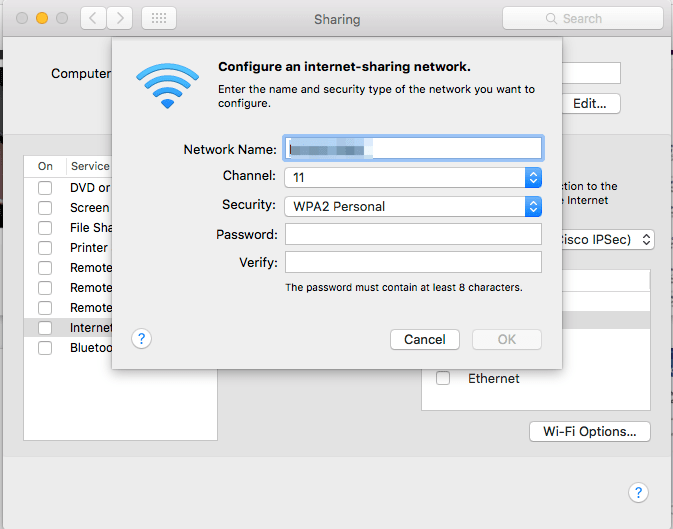
The next step is to share the connection with others via Wi-Fi. It’s up to you whether you choose to customize the wireless network you are about to create via the Mac with a custom SSID and password or not, but we recommend that you do, since anyone – such as your neighbors – could access your VPN connection if it’s not protected by a password. And if too many devices are connected the bandwidth may be throttled, so be careful with that one, too.
Mac VPN Router Select Interface
Mac VPN Select Interface L2TP over IPSec
VPN Authentication Credentials
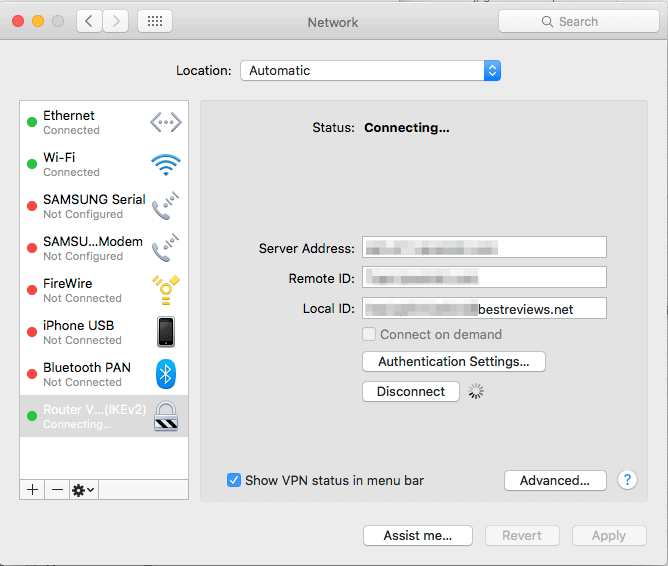
VPN Authentication Credentials

Mac Internet Sharing Option

Mac VPN Router SSID Settings
Best Mac Optimization Software of 2024
| Rank | Company | Info | Visit |
|
1
|
|
||
|
2
|
|
||
|
3
|
|
Get the Best Deals on Mac Optimization Software
Stay up to date on the latest tech news and discounts on Mac optimization software with our monthly newsletter.
Share Your Comment