![]()
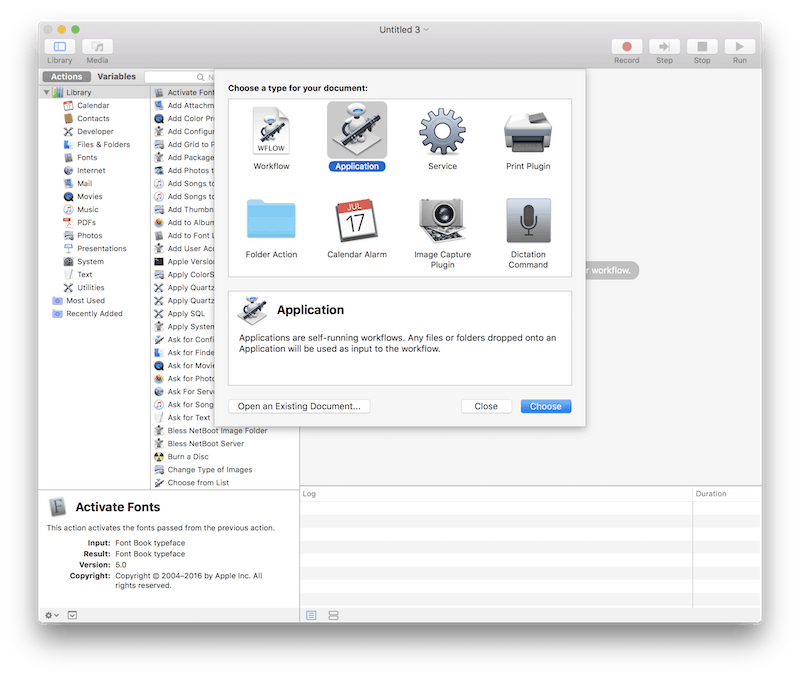
macOS includes a ton of great features for improving and enhancing your user experience, but one highly useful and often neglected tool is Automator. And from the name alone you might already be able to guess what this friendly robot was designed for: to perform tasks to speed up your workflow, such as automatically renaming files in a folder, resizing images, and much more.
Automator removes the burden of performing repetitive tasks manually and allows the user to create various workflows by tapping into a library of hundreds of pre-set actions, gaining the benefit of automation while also eliminating the need to write code yourself.
By doing so, Automator becomes accessible even to average Mac users, who only need to understand that an action may require certain information from a previous action in the workflow to perform a task. Of course, if you know shell commands then you can extend the power of Automator further within any given workflow – which we’ll demonstrate below.
It’s easy to create Automator scripts with just a little bit of knowledge, and by following our tips you’ll be able to make use of them to fix certain issues, perform mundane actions and generally boost your productivity and optimize the Mac's performance.
Remove Files Permanently
Advanced Mac users have at their fingertips far more control over their computer than the average user, and that’s mostly thanks to shell commands. Think about the hassle of dragging files to the trash can and then manually right-clicking on the icon and selecting “Empty Trash” from the menu – not a difficult or long task, but a nuisance all the same.
Fortunately, there is an easy way to automate this process with Automator via a super-easy shell command. In essence, you'll be creating a black hole on your system, so it is absolutely necessary to pay attention to the shell script to make sure you properly copy and paste the command from our guide to avoid the removal of any other files on your desktop.
- Select the “Folder” action.
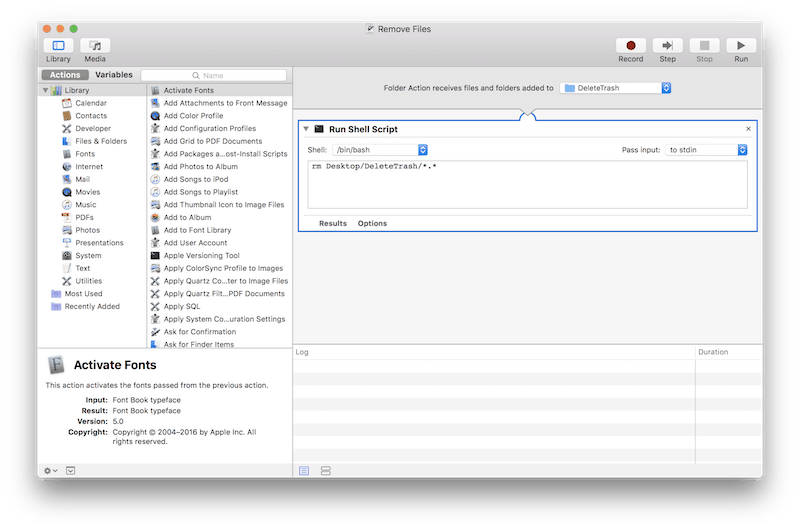
- At the top of the workflow area, select the folder that will be the target of this automation. In our example we used “DeleteTrash”.
- Drag the “Run Shell Script” action from the Utilities library into the workflow area.
- Leave the “/bin/bash/” field untouched, and type “rm Desktop/DeleteTrash/*.*” into the field below it. The “*.*” part of this script is actually a protection measure meant to remove only files and not directories or other items you may accidentally drag into this folder.
- Save the workflow.
The next time you want to remove a file, instead of dragging it into the trash can just drag it into this folder. Be careful though: this file will be permanently and irreversibly removed from your Mac, so there’s no restoring it.
Automatically Move and Sort Downloaded Items
It's easy to keep the Downloads folder uncluttered without any manual input, you just need a good Automator workflow that will sort the files based on the rules that you set. In our example, we will create a folder action that will collect all DMG files in one folder and all pictures in another. First, you need to create two new folders, which we created on our desktop and named Disk Images and My Pics.
- Select “Folder Action” from the workflow templates.
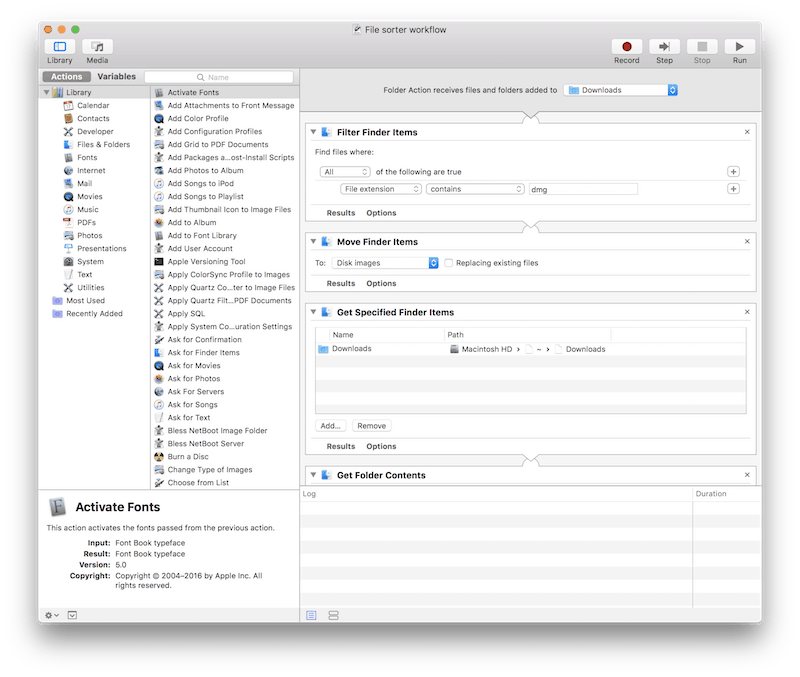
- In the resulting workflow, select your “Downloads” folder as the target folder.
- From the “Files & Folders” library, select “Filter Finder Items” and drag it into the workflow area.
- Configure the action to read “File extension contains dmg”.
- Drag the “Move Finder Items” into the workflow area.
- Pick the “Disk Images” folder in the “To” field.
- Drag “Get Specified Finder Items” into the workflow area.
- Add the “Downloads” folder as the targeted folder of this action.
- Click this action's “Options” button and enable the “Ignore this action's input” option.
- Drag the “Get Folder Contents” action into the workflow area, and leave it as it is.
- Drag the “Filter Finder Items” action into the workflow area.
- Configure the action to read “Kind is image”.
- Drag and drop the “Move Finder Items” into the workflow area.
- Select the “My Pics” folder as the target in the “To” field.
- Save your folder action with a name you'll remember.
Don't panic if you don't see the workflow's result as soon as you save it. It may need your input to first download items that match the criteria (such as a DMG file or an image) to see it in action.
Automate Folder Backup
Time Machine does a great job of backing up data, but sometimes you need a little more. Perhaps you might need a secondary copy of important data or maybe you need backups more frequently than Time Machine provides. The Automator workflow below does just that, by taking items placed into a specific folder and backing them up onto another drive.
- Create a new folder, and name it something like “Auto Backup”. On another drive, create a new folder and name it “Backed Up”, for example.
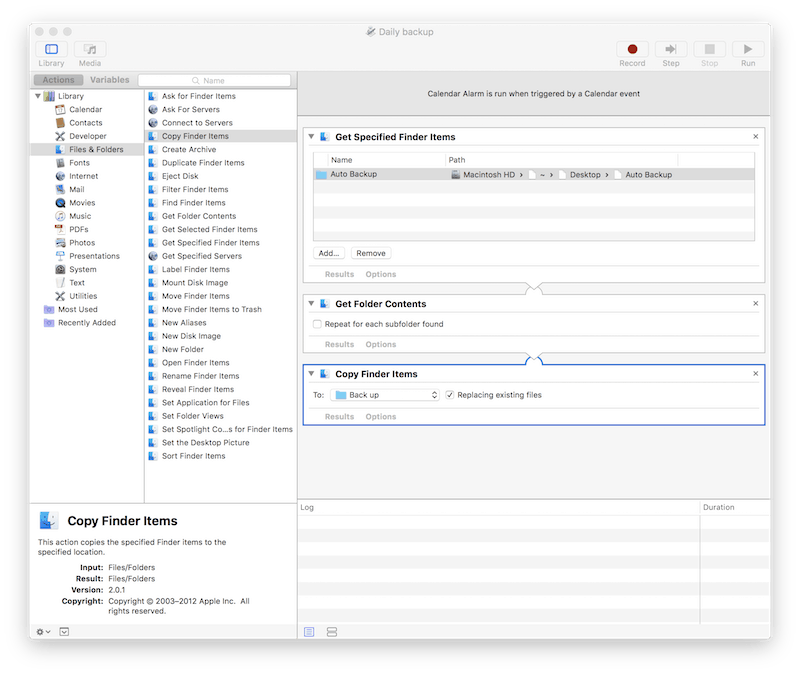
- Launch Automator, and select “Calendar Alarm”.
- Drag and drop “Get Specified Finder Items”.
- Drag your “Auto Backup” folder into this action.
- Drag “Get Folder Contents” into the workflow.
- Drag “Copy Finder Items”.
- Drag the “Backed Up” folder into this action and enable the “Replace Existing Files” option.
- Save the workflow with the name “Daily Backup”, for example. This will launch Calendar, and your workflow will appear in an Automator calendar that is created automatically.
- Select the created “Daily Backup” event, and press the Command + E keys for the edit options to appear.
- Set the desired frequency (in our example we chose to repeat it every day) and the time of the automated backup.
- From this moment on, just be sure to have your external drive connected to the Mac at the necessary time and the workflow will automatically create a backup of that specific folder.
As you can see, the possibilities are limited only by the number of built-in library items. However, with a little bit of programming knowledge you will push yourself beyond these limits, and as a result end up writing scripts and creating workflows for all sorts of complex tasks – such as finding duplicated files or even showing hidden files.
Best Mac Optimization Software of 2024
| Rank | Company | Info | Visit |
|
1
|
|
||
|
2
|
|
||
|
3
|
|
Get the Best Deals on Mac Optimization Software
Stay up to date on the latest tech news and discounts on Mac optimization software with our monthly newsletter.
Share Your Comment